PCA9685 PWM Board Bring Up
The RoboCar I’m building needs to be able to control its steering servo and motor controller which both are driven by a PWM signal. Unfortunately single board computers (SBC) use a 40-pin GPIO, which only has one PWM output. The RockPi 4C board I am using cannot drive both. The solution to this is an I2C 16 channel PWM board called the PCA9685. These can be bought inexpensively, and while they are advertised for LEDs they can drive other things.
The next problem is interfacing with the board. An initial review of the ROS driver space found a number of options, but they were all for old version of ROS, so I picked the best looking one, ros-i2cpwmboard and started porting it across to ROS2. This proved harder than I originally thought because it’s fairly complicated code using an old C++ style. I got about half way, and then I realised I forgot to check if the hardware had been implemented in a kernel module. A quick scouring of the internet showed that there already exists a Linux driver for the PCA9685 chip, and it has been merged into the kernel source code.
Unfortunately Armbian kernels do not come with that driver compiled. So I had to learn how to do that and how to install a devicetree so the module is loaded on boot and the device is recognised. I have documented the process I went through to get it working.
For those using Raspberry Pi boards, I believe the modules are compiled and there is an overlay for this device already.
Plug in the board via I2C
First thing to do is to check to see if everything is working as expected before introducing more unknowns. We plug in the board, configure the SBC and enable the I2C bus, then scan that bus to see if the device appears.
Find the correct pin out for your board
This is found out by browsing the documentation for your SBC. For my board this is here.
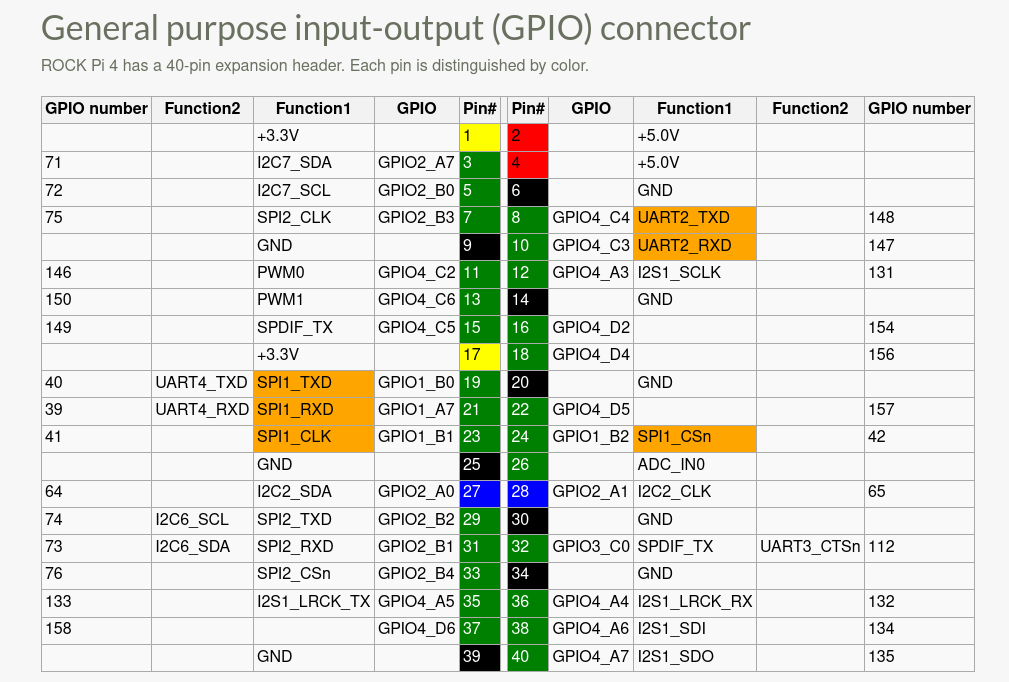
GPIOs 71 and 72 show functions of I2C7_SDA and I2C7_SCL which is data signal and clock signal, respectively. From this we can see the I2C bus has an id of 7. I plug in the PCA9685 board matching the signals to what is labeled on the board, and connecting to the 3.3V power pin and GND.
Configure board so correct I2C bus is active
To enable the I2C bus, the board has to be configured using what is called a Device Tree. These trees are kept in the kernel source for boards that have been mainlined. They’re fairly complicated, so thankfully there are usually utilities that can enable device tree overlays.
I run the Armbian configuration utility to enable i2c7:
sudo armbian-config
Select System, then Hardware and then enable the i2c7 bus.
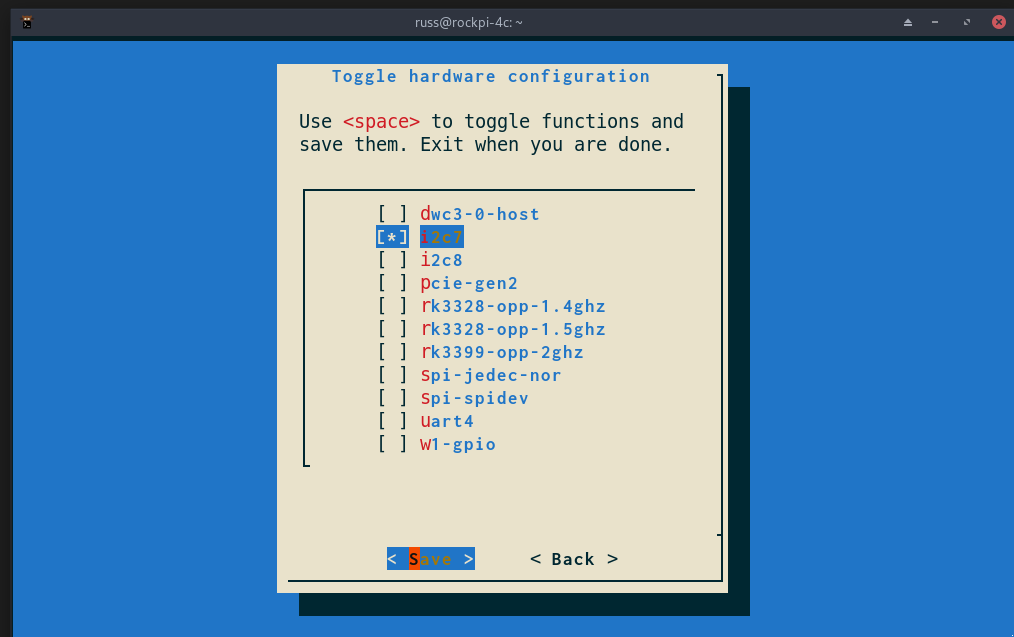
Save the changes and reboot the board to boot the system with the new configuration.
Scan the bus to find the PCA9685 device
For this step you need the handy i2cdetect tool. This is found in the i2c-tools package on Debian/Ubuntu operating systems. Install that using the OS’s package manager:
sudo apt-get install i2c-tools
With that installed, enumerate the I2C buses that the kernel was able to detect:
sudo i2cdetect -l
My output looks like this:
russ@rockpi-4c:~$ sudo i2cdetect -l
i2c-3	i2c       	rk3x-i2c                        	I2C adapter
i2c-1	i2c       	rk3x-i2c                        	I2C adapter
i2c-4	i2c       	rk3x-i2c                        	I2C adapter
i2c-0	i2c       	rk3x-i2c                        	I2C adapter
i2c-7	i2c       	rk3x-i2c                        	I2C adapter
And from this we can see the i2c7 bus is available. Great. Now we scan what’s on it:
sudo i2cdetect 7
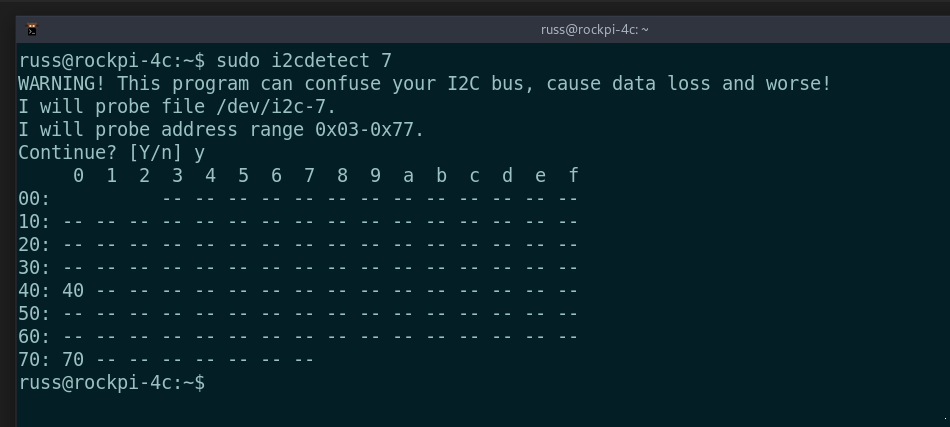
There is a device on 0x40 which corresponds to the default I2C address of the PCA9685 board! All is working so far.
Compile kernel driver
Armbian does not compile this particular module by default. However, your system might be different. Check the modules directory for the compiled kernel module. Your system will almost certainly be different from mine, so you will have to correct the commands by substituting your kernel version.
ls /lib/modules/5.10.43-rockchip64/kernel/drivers/pwm/
I see three files listed: pwm-cros-ec.ko pwm-meson.ko pwm-sun4i.ko, none of which is what I need, and in turn means I have to compile it. If you see a file pwm-pca9685.ko it means you are in luck and can skip this entire section.
Install dependency
There is only one dependency apart from the build tools:
sudo apt install libncurses-dev
Install kernel sources
Install the kernel headers and kernel source for your current running kernel version. This might take some research on how to do it on your operating system. Confusingly I was unable to find the exact same version of the kernel source code running, so I grabbed the closest version as the difference was only at the patch level (the third number in the version number).
sudo apt-get install linux-headers-current-rockchip64 linux-source-5.10.35-current-rockchip64
Unpack kernel sources to home directory.
mkdir ~/kernel
cd ~/kernel
tar -xvf /usr/src/linux-source-5.10.35-rockchip64.tar.xz
We want the same configuration used to compile the running kernel. The config is stored in the /boot directory. Copy existing kernel configuration to our build directory:
cp /boot/config-5.10.43-rockchip64 .config
In addition, the symbols need to be copied across in order for the module to link to the running kernel. The symbol table resides in the kernel headers package.
cp /usr/src/linux-headers-5.10.43-rockchip64/Module.symvers .
I had to run the following commands in order to match the versions between the kernel I was running (5.10.43-rockchip64) and the module (version 5.10.35). Without this the module refused to be loaded due to version mismatch.
touch .scmversion
cp /lib/modules/5.10.43-rockchip64/build/Makefile .
Basically, what is returned by the uname -r command has to be defined and exactly the same in the Makefile, for example:
russ@rockpi-4c:~$ uname -r
5.10.43-rockchip64
and the top few lines of the Makefile:
# SPDX-License-Identifier: GPL-2.0
VERSION = 5
PATCHLEVEL = 10
SUBLEVEL = 43
EXTRAVERSION = -rockchip64
NAME = Dare mighty things
With that done, load the “old” config:
make oldconfig
Prompts for numerous settings appeared, to which I selected n for all. Now to configure the kernel to build the desired device driver as a module:
make menuconfig
- From the menu options first find Device drivers, select it and hit enter.
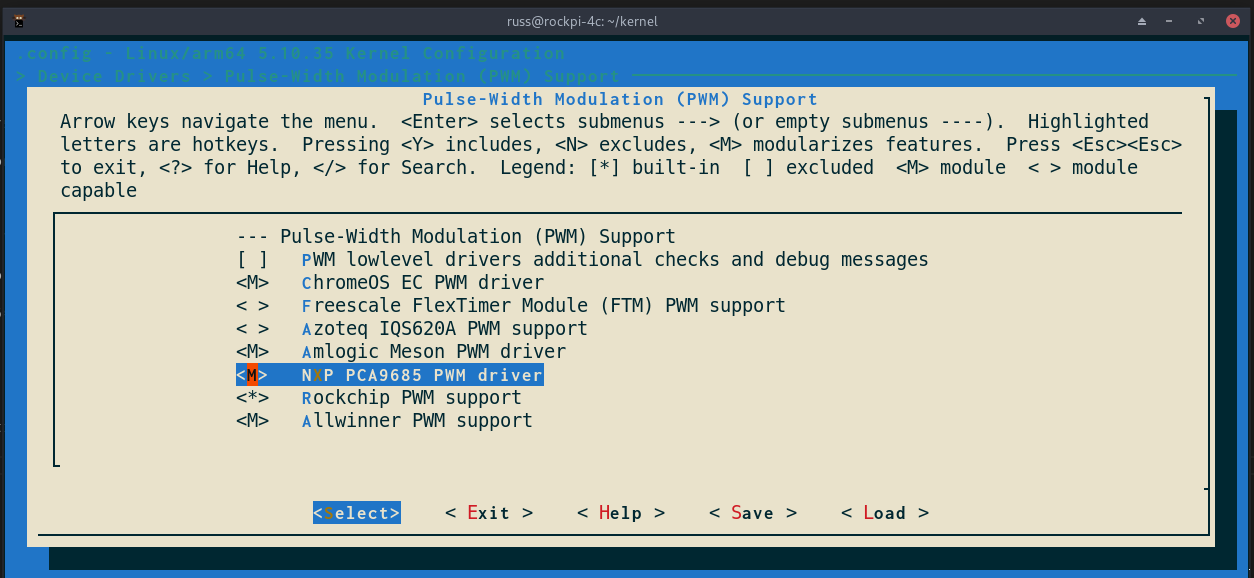
- In the new screen scroll down until you find Pulse-Width Modulation (PWM) Support and hit enter.
- Select NXP PCA9685 PWM driver and press the space-bar. It should now show a
Mto the left of the name. This means it will be compiled as a module. - Press the right arrow key twice to change to Save. Press enter, and again to override the
.configfile. - Press left arrow key to select Exit and press enter. Keep exiting until you return to the terminal prompt.
Build the modules
With all that done the module can now be compiled. Run these commands:
make scripts prepare modules_prepare
make -C . M=drivers/pwm
A number of kernel modules will now be compiled. Don’t worry, we are only interested in one. We copy that module into the running kernel’s module directory:
sudo cp drivers/pwm/pwm-pca9685.ko /lib/modules/5.10.43-rockchip64/kernel/drivers/pwm
The following two commands rebuilds the module dependency list, and loads the module into the kernel:
sudo depmod
sudo modprobe pwm-pca9685
There should be no errors. If there was no message the driver has been compiled successfully and loaded into the kernel.
Device Tree
Device tree configurations are something I have not spent any time with, so my approach was to find an example overlay and modify it for my use. I was able to find the Raspberry Pi overlay for this exact device which saved me a lot of reading. I had to change two lines, first the compatible line to match what was displayed in my SBC’s device trees in the kernel tree. Secondly was the target line, it was changed to reflect the correct I2C bus the device is plugged into. The result is the following file:
// Definitions for NXP PCA9685A I2C PWM controller on rockchip
/dts-v1/;
/plugin/;

/{
        compatible = "radxa,rockpi4";

        fragment@0 {
                target = <&i2c7>;
                __overlay__ {
                        #address-cells = <1>;
                        #size-cells = <0>;
                        status = "okay";

                        pca: pca@40 {
                                compatible = "nxp,pca9685-pwm";
                                #pwm-cells = <2>;
                                reg = <0x40>;
                                status = "okay";
                        };
                };
        };
        __overrides__ {
                addr = <&pca>,"reg:0";
        };
};
I saved this file to my home directory as i2c-pwm-pca9685a-overlay.dts. Then I used an Armbian tool to add the overlay to the boot configuration:
sudo armbian-add-overlay i2c-pwm-pca9685a-overlay.dts
All that’s left to do is reboot the system to apply the new overlay. Inspecting the discovered devices on the system shows this:
russ@rockpi-4c:~$ ls /sys/class/pwm/
pwmchip0  pwmchip1
russ@rockpi-4c:~$ cat /sys/class/pwm/pwmchip1/device/name
pca9685-pwm
russ@rockpi-4c:~$ cat /sys/class/pwm/pwmchip1/device/gpio/gpiochip496/ngpio
16
A pwmchip1 device for the PCA9685! Now it can be interfaced with using the kernel PWM interface. Instead of writing in specific low level device handling into the driver, it can be a thin layer on top of the kernel interface, if a driver that does exactly this doesn’t already exist!
Stay tuned for the next post on the ROS2 driver for this.
References
I figured this out from a range of sources, but was unable to find a guide that explained this exact process.